


Get your FREE 30-day trial.
Please complete all fields.
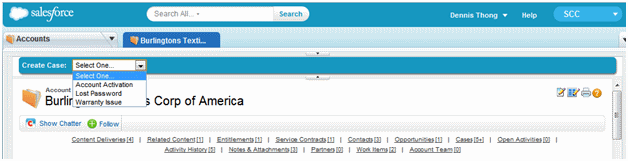
One of the features of the Service Cloud console is the ability to add Visualforce custom components to various parts of the console, either at a primary tab or a sub tab level. One possible use case is to provide agents the ability to quickly create records (e.g. a case) from a toolbar in the console that:
1. Provides a list of record types that respect the object permissions for the user that on selection
2. Opens a New Record sub tab using the context that the user is currently in. For example, if the user is currently viewing an Account record, opening the New Case subtab would also populate the Account in to the case
A Quick Create Toolbar
Now you can do this using the power of the Service Cloud Integration Toolkit, Console Components and Dynamic Apex. Note that this post assumes you have some knowledge of Apex, HTML, JavaScript and Visualforce.
Firstly, click here to install an unmanaged package into a Developer organization. It only supports Case creation from Account page layouts and you’ll need to manually put the Visualforce page into the page layouts as console components. You’ll also need to have created a few record types against the Case object.
If you want to deploy the package to a sandbox, change the URL to https://test.salesforce.com.
Alternatively, you can access the code behind the package here, and find instructions on how to compile and deploy the code.
The various components of the package are:
After you install the package, you need to:
The whole point of this code is to generate a URL for the Service Cloud Console Toolkit that looks something like this:
/500/e?def_account_id=<account_record _id>&ent=Case&isdtp=vw
The Visualforce Page will then use the Toolkit to add the parameter to set the RecordTypeId, but a little bit more about that later.
The above URL is part of what gets generated when attempting to create a new case from an account. Let’s break down the important parts of the URL:
Let’s explain what goes on in the controller:
The Service Cloud Console always passes the current sub tab or primary tab record id into the Visualforce console component. Hence the constructor will populate the currRecordId property with the record Id. This is important for the URL.
/* Constructor */
public SCCQuickCreateToolbar_Controller () {
// Get the current record Id
currRecordId = ApexPages.currentPage().getParameters().get('Id');
}
Then we need a list of case record types to populate in the drop down. This is the caseRecordTypes property. We’ll use the power of dynamic Apex and Apex describes to do this without hardcoding:
To allow us to be a little bit more flexible in the future. The two properties currObjectType and currRecord will allow us to obtain and store information about the record to populate any additional fields in the URL for defaulting. For example, if we needed to create a case from the contact, we actually need to populate def_contact_id and def_account_id URL parameters and this could be obtained by querying the Contact record using the Id URL parameter.
The currObjectType property is a clever example of Apex Describe once again by trying to discern the type of object from the first 3 digits (the key prefix) of the Record Id by:
sObjectByKeyPrefix = new Map<String, Schema.sObjectType>();
for (Schema.SObjectType sObj : Schema.getGlobalDescribe().values()) {
sObjectByKeyPrefix.put(sObj.getDescribe().getKeyPrefix(), sObj);
}
Schema.sObjectType currsObjectType = sObjectByKeyPrefix.get(currKeyPrefix);
currObjectType = currsObjectType.getDescribe().getName();
The currRecord property allows us to get more information about the current record. We’ll discuss more about this when we talk about extending the functionality, but for now, we can put this altogether to generate the URL prefix in the caseCreateURLPrefix property.
Let’s discuss some of the important parts of the URL and how we populate them. We’ll use the PageReference object to allow us to easily add parameters and then get the URL from it at the end:
PageReference pageRef = new PageReference('/' +
Case.sObjectType.getDescribe().getKeyPrefix() + '/e');
if(currObjectType == 'Account'){
pageRef.getParameters().put('def_account_id', currRecordId);
}
So now we’re ready to use this on our Visualforce page, but first, let’s style the toolbar so it gets the same form factor as the rest of the console.
There’s not much to explain here except:
· The background color is the same as the Console’s header
· There’s some CSS3 markup that gives rounded corners on the more modern browsers
· It sets up margins and other styles for labels and fields
The styles will be used in the Visualforce page to give it a similar form factor to the Service Cloud Console.
There are a few critical parts to the Visualforce page:
<apex:selectList multiselect="false" size="1" id="createCase" onchange="QuickCase()">
<apex:selectOptions value="{!caseRecordTypes}"/>
</apex:selectList>
caseRecordTypeSelectField = document.getElementById('{!$Component.theForm.createCase}');
// Get the record type id
caseRecordTypeId = caseRecordTypeSelectField.options[caseRecordTypeSelectField.selectedIndex].value;
sforce.console.getEnclosingPrimaryTabId(openCase);
sforce.console.openSubtab(result.id , '{!caseCreateURLPrefix}&RecordType='+caseRecordTypeId, true, '', null);
Once you’re done, you need to add this to your page layouts either as a primary tab or sub tab custom component.

Adding the Quick Create Toolbar
If you use a primary tab console component, the current record context is taken from the primary tab, whereas if you use a secondary tab console component, the record context is taken from the currently open sub tab. Which one you go for will depend on your business requirements.
It’s quite easy to extend the sample code to default fields from other parts of the application (e.g. defaulting the contact when exposing the toolbar in Contact page layouts).
Here’s an example using Contact:
/500/e?retURL=%2F00390000002XJSU&def_contact_id=00390000002XJSU&def_account_id=00190000003pf3T&RecordType=012900000001D0I&ent=Case
if (currObjectType == 'Contact') {
currRecord = Database.query('SELECT ID, AccountId, Name from Contact
where id = \'' + currRecordId + '\'');
}
if (currObjectType == 'Contact') {
pageRef.getParameters().put('def_contact_id', currRecordId);
pageRef.getParameters().put('def_account_id',
((Contact) currRecord).accountid ); // cast the sObject to contact
}
This post has demonstrated a great use case for Service Cloud Consol custom components. Using a combination of Apex Describes and the Service Cloud Integration Toolkit, we’ve provided a flexible method to create a toolbar to allow Console users to create new cases whilst maintaining the current context.
If you have any questions or feedback about this blog, please feel free to reach out to Gautam Vasudev or Dennis Thong. We would love to hear suggestions about other Service Cloud blog topics as well.
The Service Cloud Console - A Quick Create Toolbar


