")


Get your FREE 30-day trial.
Please complete all fields.
While Lightning Process Builder has taken over the BPA (Business Process Automation) scene in the Salesforce development world, workflow and workflow rules are still very much alive for many Salesforce customers around the globe. I’ve taken an excerpt from my book, Practical Salesforce.com Development Without Code, and updated it for what I intend to be a helpful blog post for workflow developers / administrators.
The one thing you’re guaranteed to find in every active instance of Salesforce is interaction. It is a given that your users will add, edit, and/or remove data from your org on a regular basis. Consider these updates to Salesforce as the first step in your automation efforts . The second step is making Salesforce do what you want based on that initial user interaction with no further manual activity from users. In this post, we’ll examine how to make that happen with workflow rules.
What Salesforce refers to as a “workflow rule” is an extremely powerful way to take one of these regular, everyday interactions and allow it to drive your business forward without spending the time or money to have additional people or systems make the change happen. At the simplest level, I can describe workflow rules as operating as explained below:
Through this process, your organization has taken an additional step forward using process automation. Whether you use workflow rules to notify a colleague that further action is needed or you update a field to reflect the current state of data, you have ensured that some desired action will happen and you did it all with a small, one-time investment of your cerebral efforts as opposed to an ongoing, manual activity.
With the potential value that lies in workflow rules comes a critical need for a solid understanding of these rules and a strategic approach when building them. You will quickly find that there are numerous ways to automate one business process; you will also discover that there is usually a best option. To that end, I will dissect each component of this functionality to help guide you through the decision-making process as you automate your own organization’s processes.
After going over the workflow rule framework and how to effectively use it, I will examine four scenarios and demonstrate how to take real-world business processes and automate them in Salesforce via workflow rules. Knowing how to create a workflow rule is critical, but our end goal is actually satisfying a business need through the workflow rules. By the end of this post, you will:
Before you create a workflow rule, you’ll need to make sure you clearly understand each piece of the proverbial puzzle. It is very easy to create a workflow that does not do what you want it to do, and that is no fault of Salesforce. My goal is to prepare you so that you can minimize adjustments and tweaks after you create workflow rules. Once you have an understanding of the workflow rule elements, I will walk you through each step of the creation process for workflow rules. By building upon a solid foundation and delivering your solutions with precision, you can enjoy the lovely silence of satisfied users after putting this post into practice.
The “base object” (my term, not Salesforce’s) is the object on which the initial, manual (non-automated) data change will be performed. For example, assume you have a custom object called Property that has a Master-Detail relationship to the Account object. If you wanted to make a change to a Property record to drive an automated, system, you would identify the Property object as your base object. That may seem obvious, but it is important to note that the object that is automatically updated through a workflow rule may differ from the base object. In Figure 4-1, I have identified the object being updated as the “action” object. In other words, a change to Object 1 may trigger an automated update to Object 2; this is called cross-object workflow and will be covered later in this post.

Figure 4-1. The “base” object can update a Parent record with which it has a Master-Detail relationship (see left side of diagram). Most commonly, workflow rules drive an update of the record that triggered the rule (see right side).
The base object refers to the object where the initial activity occurs, not necessarily where the update takes place. On the left side of the diagram, Object 1 has a Master-Detail relationship with Object 2 that allows configuring a workflow rule to update an object different than the base object.
Navigate to Setup > Create > Workflow & Approvals > Workflow Rules. You will select your base object from the available picklist of objects shown in Figure 4-2.
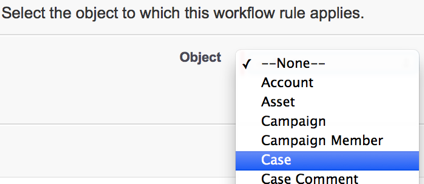
Figure 4-2. Base object selection in your workflow rule
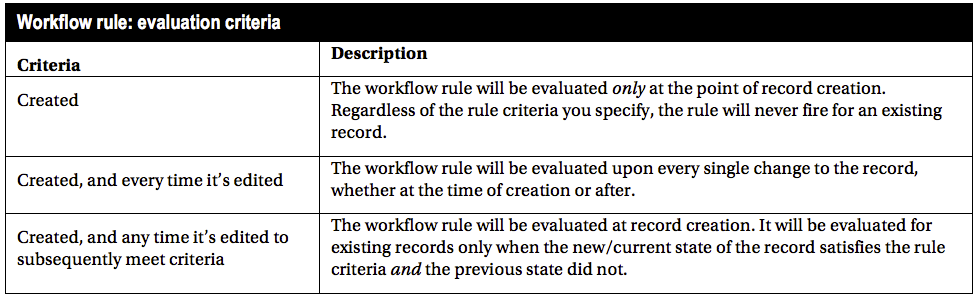
Once you identify your base object, you will need to configure its evaluation criteria. By establishing the evaluation criteria, you are setting the conditions in which the workflow rule should be considered or evaluated. You can think of it as the first “gate” that needs to be passed through for your automated business process to occur. The choices are fairly straightforward; you must select one of the three available evaluation criteria options identified and described in Table 4-1.
Table 4-1. Evaluation Criteria Options Within a Workflow Rule
The “Created, and any time it’s edited” option in Table 4-1 trips some people up. Table 4-2 and Figure 4-3 exemplify real-life scenarios and the resulting outcomes when using this option.
Table 4-2. A Workflow Rule Using the “Created, and Any Time It’s Edited” Option. Bolded field labels and values signify that the value has been modified from the previous state.
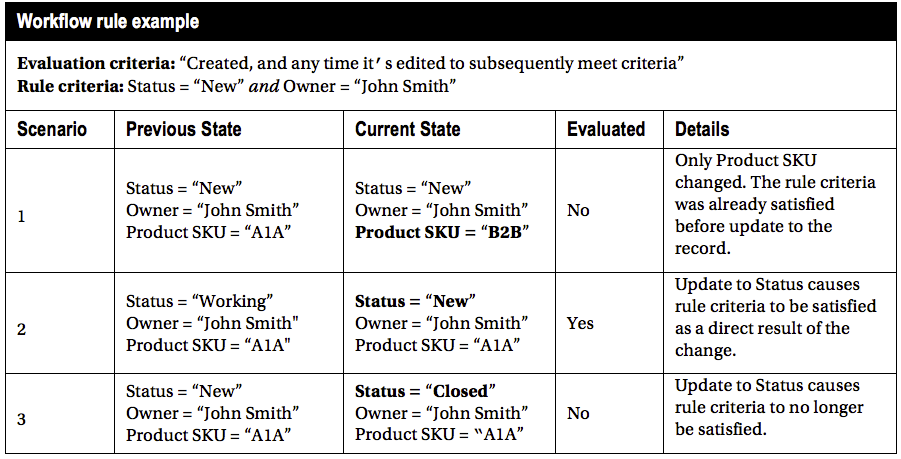
Figure 4-3 looks at a different scenario than Table 4-2 but also uses the same evaluation and rule criteria. Note that bolded text signifies a field that’s value changed in the current step.
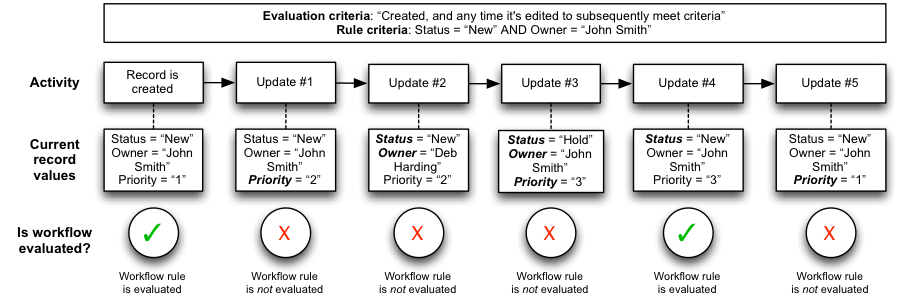
Figure 4-3. Because the evaluation criteria setting includes “Created, and any time it’s edited to subsequently meet criteria,” the workflow rule will only be evaluated if the rule criteria are satisfied AND they were not already satisifed before the most recent update.
NOTE Depending on what you want to do with your workflow rule, you may not actually have a choice of your evaluation criteria. For example, if you plan to incorporate time-based actions into your workflow rule, you must select “Created, and every time it’s edited.” Although Salesforce forces you to select this option when using time-based actions, knowing this in advance will help you build solutions via workflow rules more quickly and efficiently.
Unlike evaluation criteria, which are comprised of three predefined options, rule criteria are completely wide open and allow for significant flexibility and creativity. Rule criteria equate to the second “gate” in Figure 4-2, which provides an overview of whether corresponding workflow actions are fired by a particular record update.
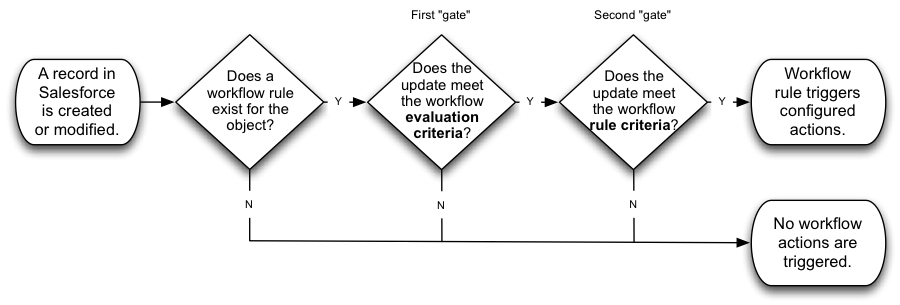
Figure 4-4. The multiple “gates” that the creation or modification of any record has to pass through before a workflow action will occur
The rule criteria come into play if and only if one or more active workflow rules exist for the object of the record being updated and the evaluation criteria of the workflow rule(s) have been met. The rule criteria that you configure will then be evaluated; if the evaluation deems them to be true, the associated workflow actions will be triggered. Rule criteria can be built by using one of the following tools:
The first and probably most commonly used tool available to you when establishing your rule criteria is the standard “criteria builder.” There is actually no official name for this element; I am coining the term for the purpose of quickly identifying this option in the workflow rule creation process . You will find the criteria builder used throughout Salesforce, not just in workflow rules. This criteria builder is also applicable to list views, assignment rules, and escalation rules. This tool allows you to create one or more statements that can be evaluated as true or false. Figure 4-5 is a view of the criteria builder within the workflow rule framework.
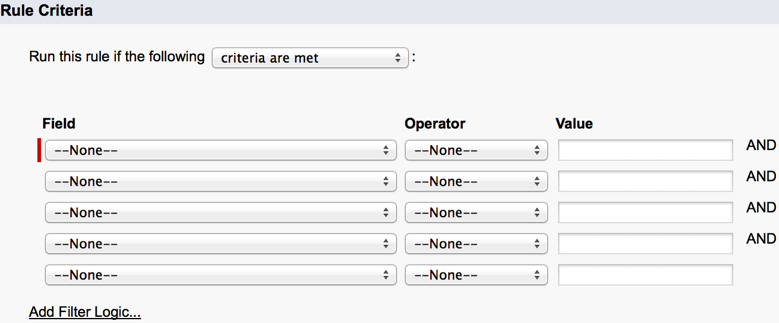
Figure 4-5. Salesforce’s framework for building your set of rule criteria
The following sections review the three primary elements within the criteria builder tool: field, operator, and value. These will come together to establish one or more statements that will ultimately determine whether or not the workflow actions should occur.
There is more to a rule criteria field selection than you might think. You would be correct to assume that all of the fields on the workflow rule’s object would be available for selection. For example, if you are creating a workflow rule for the Opportunity object, you could choose Amount as your field; you could also choose any of the other standard or custom fields on the Opportunity object.
However, there are a number of additional fields that may be available depending on your object and your organization’s data model. When creating a workflow rule for a standard object, you may use fields from any objects to which your workflow rule object is related via relationship fields. For example, the Contact object has a standard field (Account Name) that is a Lookup relationship from Contact to Account. As a result, you may use an Account field for selection in your rule criteria statement. Figure 4-6 shows the lookup objects fields available for some of the most commonly used standard objects in Salesforce.
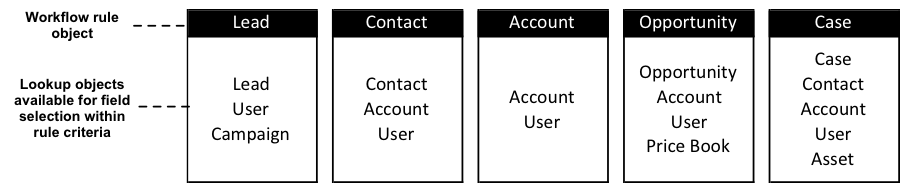
Figure 4-6. Lookup objects available for standard objects . Depending on the object you are using for your workflow rule, you may be able to establish rule criteria from fields on related objects.
The selection availability differs for custom objects. When creating a workflow rule for a custom object, you may use fields from:
NOTE The User object is available for selection as the field when using the workflow rule criteria builder. In this context, User represents the Current User (i.e., the User making the actual change to the record).
When you select a field from the same object used for the workflow rule in the criteria builder, the mode of operations is straightforward. Assume you are using the Opportunity object, you would select “Opportunity: Amount in the Field column and establish that the amount of the Opportunity is less than 100. Your workflow actions will fire if the evaluation criteria are met and the Opportunity amount in the most recent update is less than 100.
However, the flow is not quite the same when you are dealing with related objects, and it is critical to understand the difference. If you select a field from a related object for the field in the workflow rule criteria builder, you are now no longer dealing solely with the workflow rule object. Again, I will use a hypothetical scenario for you to create a workflow rule for the Opportunity object. This time, however, assume your field is the Annual Revenue field on the (Parent) Account object and that your rule criterion is (Account) Annual Revenue > 1,000,000. Obviously, an update to the Account record must take place for the workflow rule to fire. Unlike in the last example, the update to the Field object (in this scenario, Account) will not cause the workflow rule to fire. To complete the process, the Opportunity record itself will need to be updated to pick up the change to the Parent record. Take a look at the flow diagram in Figure 4-7 to help understand the process.
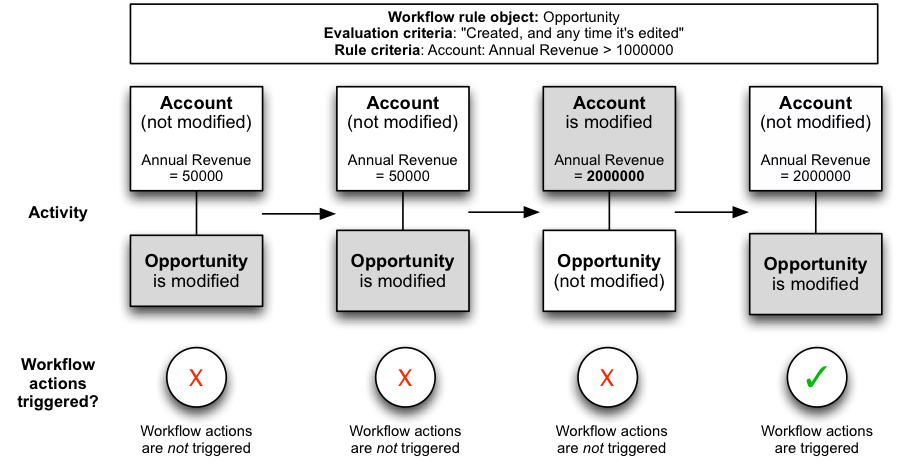
Figure 4-7 . An opportunity workflow rule based on the Annual Revenue field. It is important to understand how a workflow rule operates when the rule criteria involves a field on a related object. Here, we see that the Opportunity’s rule criteria is based on an Account field. Although the rule criteria is technically met when the Account field value is edited accordingly, the workflow actions will not fire until those changes are picked up via an edit of the Opportunity record itself.
The Child Opportunity record does not “know” that the Parent Account record has been updated. As a result, there must be a subsequent update to the Opportunity record to pick up the relevant changes to the Parent Account record. The workflow actions will be triggered at that point.
NOTE One difference between the available fields for standard and custom objects in the workflow criteria builder (but not the formula editor) is that Lookup relationship objects on custom objects are not available for use; these are only available on standard objects. For example, Account is available in the criteria builder tool when creating a workflow rule for the Contact object; however, Account would not be available in the criteria builder for a workflow rule on a custom object if the Account were related as the Master in a Master-Detail relationship.
When using the criteria builder, you are provided with an operator list and must select one value from that list to build out a given statement to be evaluated as part of the rule criteria. The list generally overlaps with the operators found within the formula editor with five exceptions: Starts With, Contains, Does Not Contain, Includes, and Excludes. These operators can be found in the criteria builder, but are not present in the formula editor as operators.
However, these operators do have equivalents with the formula editor if you take into consideration individual formula functions and combinations of formula functions. The five exceptions previously mentioned can be represented in formulas. Here is a mapping of the criteria builder operators that are listed above and the formulas that can be used in place of them:
Table 4-3 is a breakdown of operators available in the Picklists in the formula editor and the criteria builder tools.
Table 4-3. Operators for Building Workflow Rule Criteria Available via the Formula Editor and Criteria Builder

Once you have selected your field and operator, you’ll need to enter a value to complete your statement, which will be evaluated in your evaluation criteria. There are a few considerations you will need to keep in mind when you complete your statement:

Figure 4-8. Proper use of quotes in the value field when commas are not present. Quotes around text are unnecessary, unlike within the formula editor, where they are required
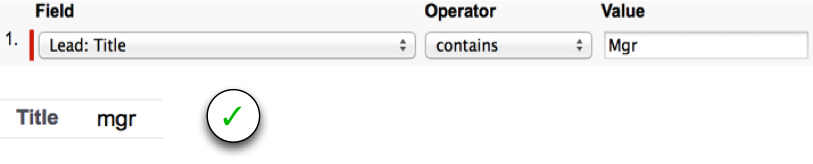
Figure 4-9. Evaluation of “mgr” is identical to “Mgr” within workflow rule criteria

Figure 4-10. Formatting a date in the criteria builder

Figure 4-11. Comparative operators will work with text

Figure 4-12. Criteria with a comma-separated list of values. Omitting quotes evaluates the comma-separated values as a list; including quotes evaluates the string as one value, even if it includes commas.
The following statements are pseudo code equivalents for the criteria statements shown in Figure 4-12. Note: “*” is a wild card.
You can and should use quotes within your value in some situations. If you are trying to evaluate a text string that contains a comma, you must surround the full string with quotes. For example, take a hypothetical status field with two values: “Submitted” and “ , Awaiting Payment”. Using an input of “Submitted, Awaiting Payment” This highlights the need to be very careful with your syntax and pay close attention to detail.
In addition to understanding how the field, operator, and value work together, you should be aware of two additional features: First, you may add rows to the default five that are displayed. You may have up to 25 rows of criteria, although this number may increase at some point in the future.
Next, Salesforce offers “filter logic” to provide even more granularity to your criteria. By default, you are creating AND statements. For example, if you create five criteria, they behave as 1 AND 2 AND 3 AND 4 AND 5. If any of the statements is not true, then the workflow actions will not be triggered. However, with filter logic, you can replace the ANDs with ORs and combine the statements in logical groupings for evaluation. Figure 4-13 applies filter logic to these criteria.

Figure 4-13. Filter logic applied to rule criteria
Figure 4-14 shows the criteria in Figure 4-13 from a visual perspective.
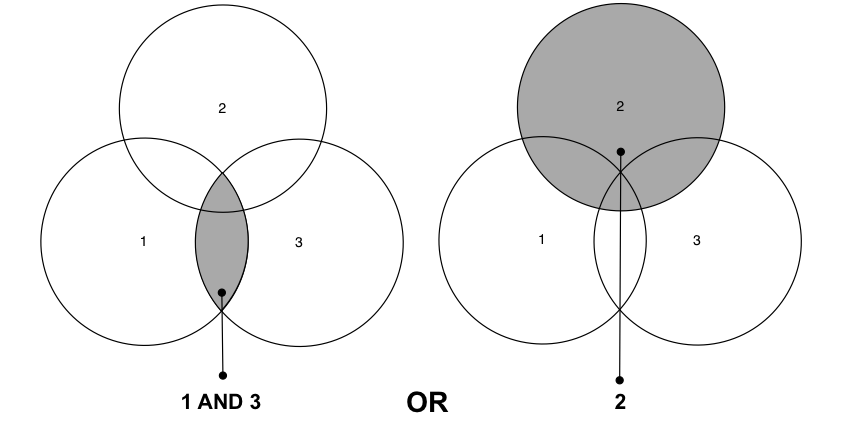
Figure 4-14. A visual interpretation of rule criteria in Figure 4-13: (1 AND 3) OR 2
Workflow rules are one of many features that utilize the formula editor in Salesforce. All of the fundamentals about formulas and the corresponding formula editor apply to the formula editor associated with workflow rules, although there are some differences between what is available in this tool for formula fields and workflow rules. When building a formula for a workflow rule, you may only use what the previously mentioned Advanced formula editor; the basic formula editor is not an option. Additionally, some functions that are available for formula fields are not available for workflow rules.
By switching to the formula editor, you potentially gain access to additional fields. If you use the criteria builder, you cannot access fields via Lookup relationships from standard to custom objects, or Lookup relationships from custom objects to any other objects. There is no way around this restriction and that factor could be fairly limiting depending on what you need to include as criteria. Fortunately, you can access both if you decide to use the formula editor.
Another significant difference in how the formula editor is used for workflow rules (and many other areas of the platform) compared to formula fields is that the formula you build here must be a Boolean statement; the evaluation must produce a true or false result. If your formula evaluates to true, your workflow actions will be triggered, but they will not be triggered if your formula evaluates to false. You cannot select from the slew of return types that are available when creating a Formula field; you are essentially forced to select “Checkbox,” which is the only Boolean option. For example, if you tried to create a non-Boolean formula with a return type of Text, you would see this error message:
Error: Formula result is data type (Text), incompatible with expected data type (true or false).
The following formula would not be valid for use as the criteria in a workflow rule:
IF(
Account.AnnualRevenue > 1000000 && Amount < 100,
“Review Opportunity for potential upsell”,
“”
)
The following formula would be valid for use as the criteria in a workflow rule:
IF(
Account.AnnualRevenue > 1000000 && Amount < 100,
true,
false
)
Once you understand how to create your criteria for a workflow rule, you will need to decide whether to use the criteria builder or the formula editor. Part of the decision will be based on your comfort level, as the criteria builder is definitely easier to use. However, since formulas are such an integral part of Salesforce development without code, creating a workflow rule may be a good opportunity to explore the formula editor. Take a look at Table 4-4 for suggestions on which tool to use to develop criteria.
Table 4-4. Guideline for Selecting Which Tool to Use for Developing Workflow Rule Criteria
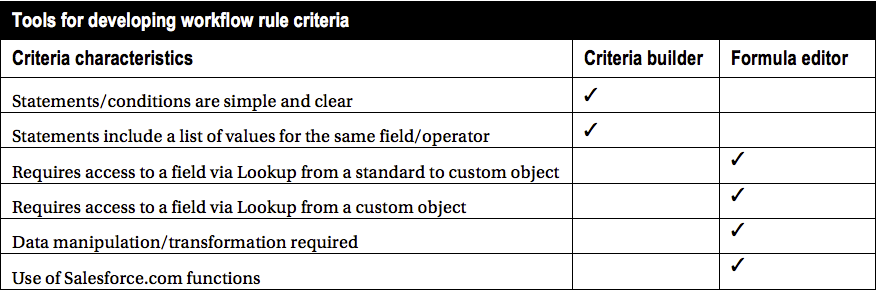
Criteria developed via the criteria builder are generally easier to maintain; however, your decision should be primarily based on your ability to meet business needs, not the ability to easily maintain the solution. If your solution does not achieve what your business requires, the ease of maintenance becomes irrelevant.
The last, but certainly not least, element of workflow rules is the resulting action or actions that occur. Everything you have done up to this point has determined whether an action will be triggered. Workflow actions determine what will actually occur; these handy helpers give you the automation in business process automation. Like with so many other features, Salesforce provides options and significant flexibility here, as well. You can configure what type of action is automated, when the action will occur, and where in the data model it will take place.
When you build a workflow rule, you have the option of creating any of a few unique types of actions:
Based on my personal experience, I would say that the Field Update action is undoubtedly the most commonly utilized workflow action type. From a development perspective, you have the most to gain by learning about this type of workflow action; as a result, I will spent much more time diving into the details of Field Updates than I will the details of the other action types. A Field Update allows you to automatically modify a newly created record or an existing record based on the state of the record data and your workflow rule criteria. Figures 4-15 and 4-16 are examples.
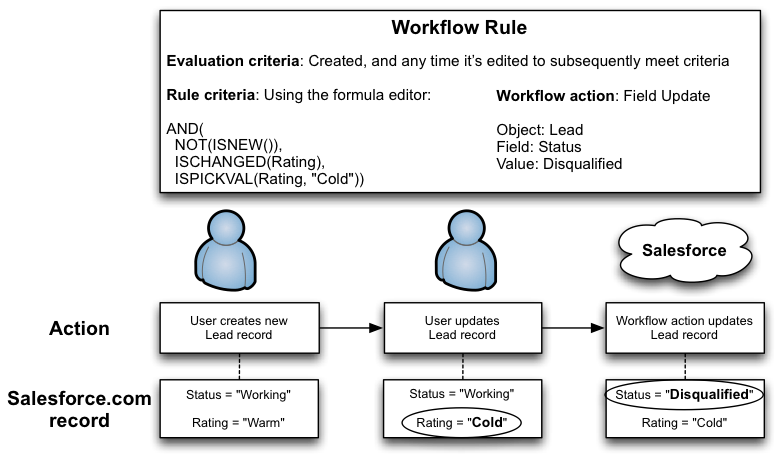
Figure 4-15. An example of the Status field being updated automatically via a workflow rule
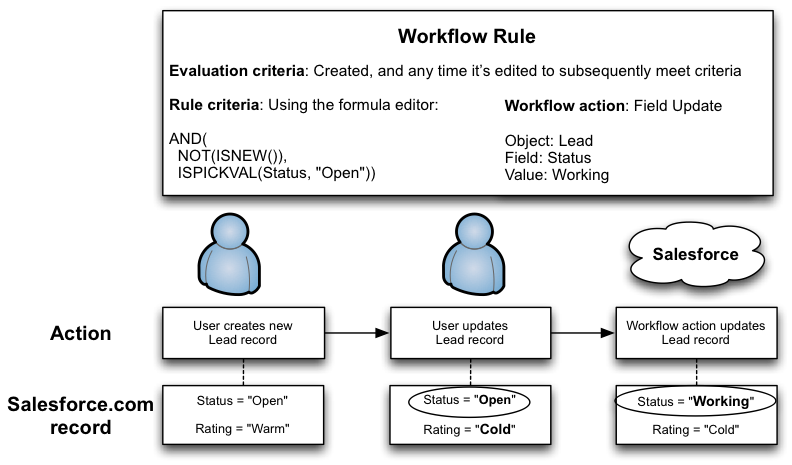
Figure 4-16. In this example, the criteria were partially met upon creation (Status = “New”), but failed to trigger the workflow action because the formula excludes new records: NOT(ISNEW()) .
You may notice in Figure 4-16 that “Object” is shown as part of the Field Update details and wonder why it is present since we have created this workflow rule for the Lead object. Recall my terms Base object and Action object from earlier in this post; the selection here is the Action object, not the Base object. In the case of the Lead object, you must select the Lead object; however, for other objects, you may have a choice here. For example, take a look at Figure 4-17 to see what is possible when you create a workflow rule for the Case Comment object.
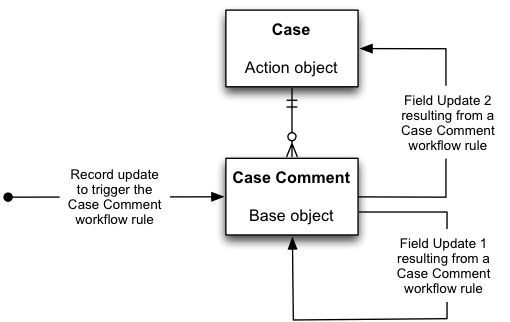
Figure 4-17. Depending on the object you are using and the relationship fields that exist on it, you may be able to update multiple records within one workflow rule.
Not only can you have multiple workflow actions occur based on the same update, you can actually update two different objects: Case Comment and Case. As you would expect, this is only available on objects that have eligible relationships with other objects. Specifically, the base object must have a specific relationship with the Action object. If a standard object is your Base object, certain standard objects may be available, as shown in the following workflows. If a custom object is your Base object, only objects to which your Base Object is related via a Master-Detail relationship are available. This functionality is referred to by Salesforce as “Cross-object workflow” and can be extremely powerful in automating your business. Cross-object workflows are available for the following object relationships:
NOTE Since you cannot create a Master-Detail relationship on a standard object, you will not be able to use a workflow rule on a standard object to update a field that resides on a custom object.
Once you have selected the Action object in your Field Update, you will select the field that you want to modify. There are a few limitations that should be considered. First, you can only update fields that are editable; you would not be able to update a formula field, for example. Second, a workflow rule trumps object and field-level security settings. In other words, a workflow rule configured to update Field B based on a change to Field A will not be prevented if the acting user does not have the ability to directly edit Field B. Likewise, a Read-Only setting on a page layout for a particular field will not prevent a workflow rule from updating that field if that page layout is invoked.
This is where things get very interesting. In Figures 4-15 and 4-16, I used simple scenarios to show how a Field Update could be used to change the Status field on the Lead object from “New” to “Disqualified” or “Working.” In those examples, I would set one of the Picklist values as the value for the Field Update and be done. As you previously learned, there are numerous field types in Salesforce; each of these has its own particular behavior when it comes to Field Updates. Field update options differ by field type. Table 4-5 conveys the type of updates that are possible for each field type.
Table 4-5. Field update Options by Field Type

Selecting “Reevaluate Workflow Rules After Field Change” will cause Salesforce to reevaluate your workflow rules. You will first want to check if one of your workflow rules is dependent on a workflow action from another workflow rule. In that scenario, leaving this field unchecked will prevent the dependent workflow rule from meeting the configured criteria. “Workflow #2” in Figure 4-18 shows an example of what can result from checking off this field.
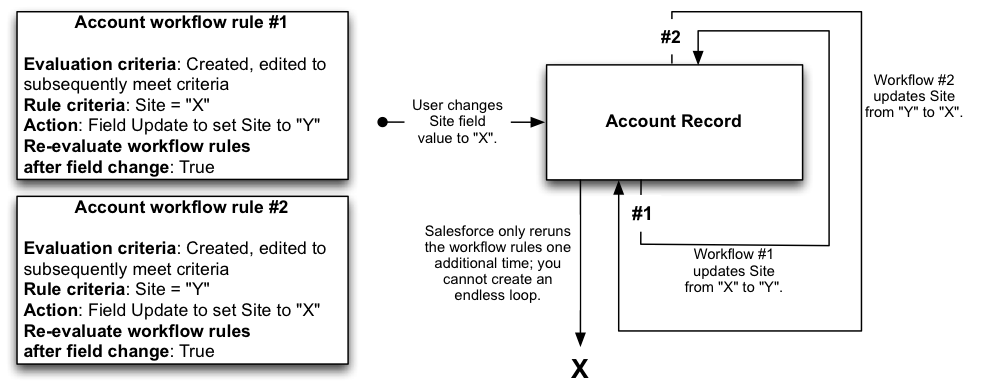
Figure 4-18. Although it may seem like creating an endless loop is very simple with workflow rules, Salesforce has built-in protection against doing so. Workflow rules can be reevaluated only one additional time based on the original event or action. The figure shows an example.
As you take in an inordinate amount of information related to field updates, it may be a challenge to see how powerful your options really are. The fact that you can use a formula to set a number of the field types gives you extreme flexibility in your business process automation, and you don’t need a line of code to make it happen. Think about this: you can determine if an automated action occurs based on the state of your record and then you can configure a dynamic update based on a formula. You have already seen what formulas can do—they allow you to pull from other fields or even other objects and return a value based on a defined condition. Put this all together and you can perform quite a bit of automation in your field update.
The second type of automated action you can create via workflow rules is significantly different than the Field Update I previously discussed. Here, you can trigger the creation of a new task record, as shown in Figure 4-19. This is fairly straightforward: you specify the values of a number of task fields to be populated in the new task record. There are a couple fields worth calling out, specifically:
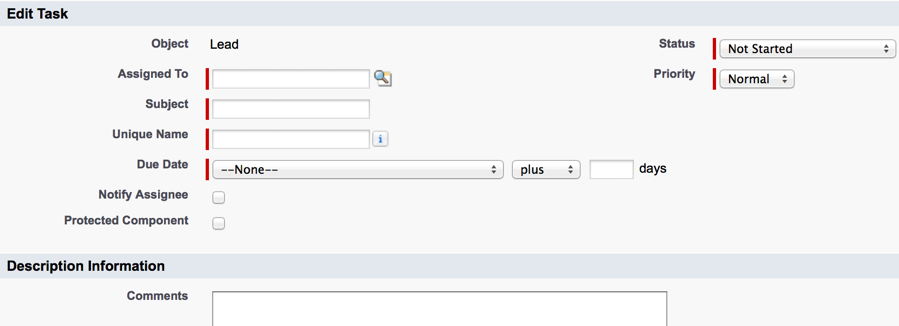
Figure 4-19. Options when creating a new task via a workflow rule
The Email Alert action allows you to automate the sending of an e-mail to one or more recipients within a workflow rule. This is a simple, but very useful, feature to utilize within Salesforce. You will find that modifications to your records will often require notifying someone of the change. One aspect of Email Alerts that is particularly beneficial is that you can send an Email Alert to an e-mail address directly; in other words, the recipients do not have to be Salesforce Users. To build out your Email Alert, you’ll have to create your Email Template in advance. Once it’s completed, you can configure an Email Alert to be triggered as part of your workflow rule. Figure 4-20 shows the Email Alert configuration screen.
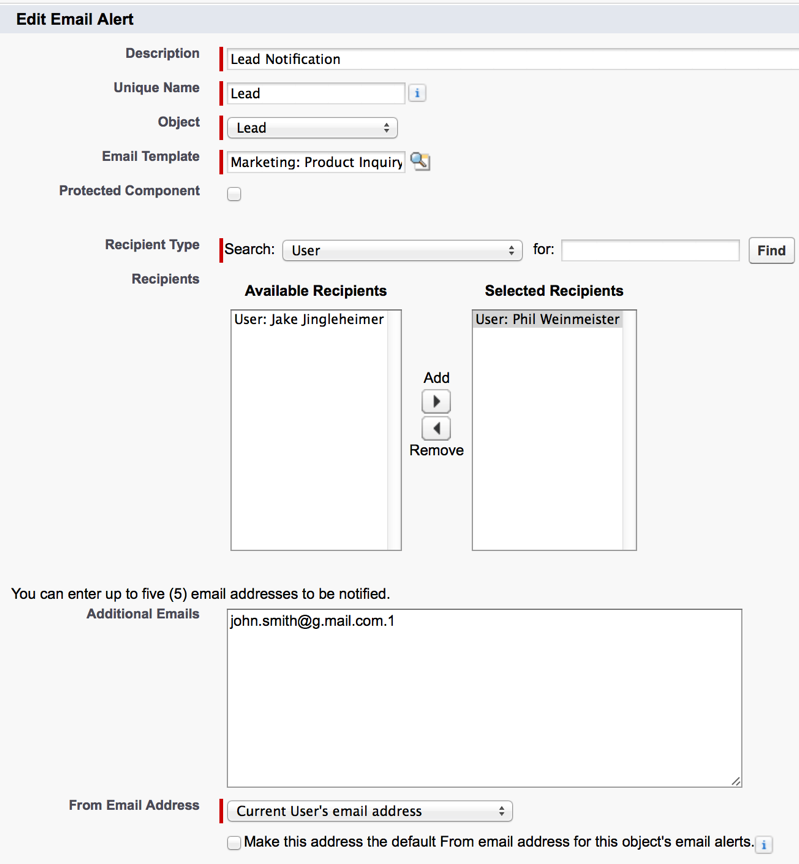
Figure 4-20. Screen options for creating an Email Alert via a workflow rule
Outbound Message is a workflow action type that allows you to send data from your record to an outside system for processing. From a Salesforce perspective, this is essentially a “send and forget” function; the actual processing of the sent data, including any responses, acknowledgements, logs, and so on, will be developed outside of your Salesforce org. Here, we decide whether an outbound message will be sent (via the evaluation and rule criteria) and what the content of that message will be. To complete the loop of what you can do with outbound messages, you will need to understand how to develop web services that can process SOAP (simple object access protocol) messages. Figure 4-21 shows the Outbound Message configuration screen.
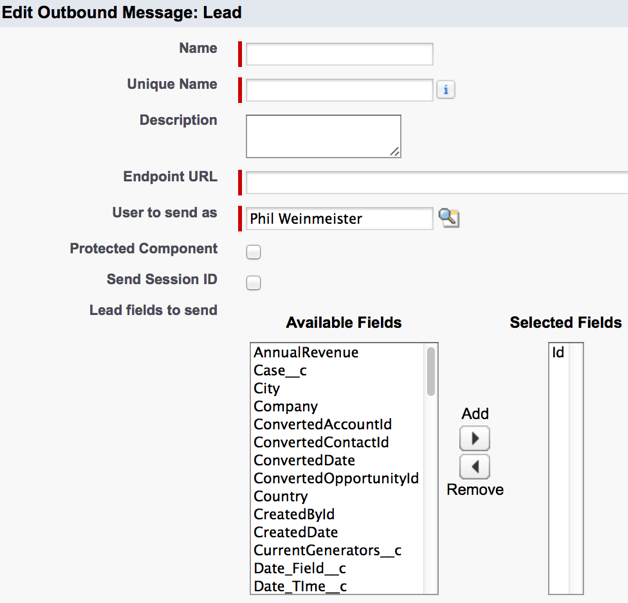
Figure 4-21. Screen options when sending an outbound message via a workflow rule
NOTE A “Flow Trigger” is an additional type of workflow action that is available. However, it is not available in all orgs. Contact Salesforce for more information.
So far, I have spoken about field updates in the context of immediate activity: A record is modified and that modification triggers a system update that immediately follows the original action. However, there is another option called “time-based workflow actions” that completely changes that paradigm. Time-based workflow actions allow you to control when your configured actions occur; this is defined as your “time trigger.” You can configure the following within a time trigger:
Figure 4-22 explains each of the available time trigger options.
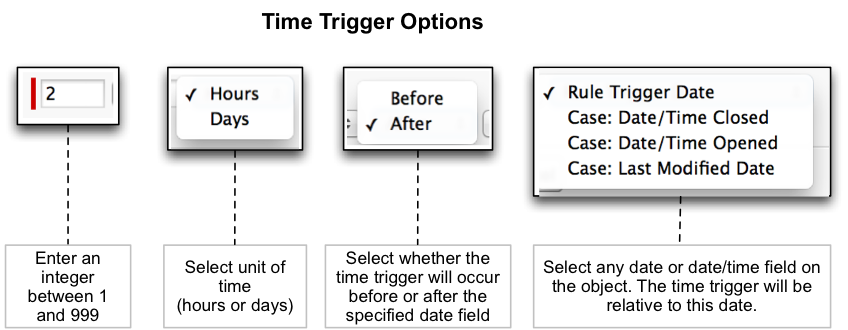
Figure 4-22. You can configure four settings that establish how your time triggers will behave.
NOTE A time-based workflow action will not be created if the time trigger is based on a Date or Date/Time field that is blank on the modified record. For example, let’s assume I have a time trigger that performs an action five days before my custom “Expected Completion Date” field value. If the Expected Completion Date field value is blank, no action will be created.
In the example shown in Figure 4-23, one workflow rule has three resulting actions taking place: field update #1 immediately, field update #2 an hour after the action, and email alert #1 three hours after the original action.
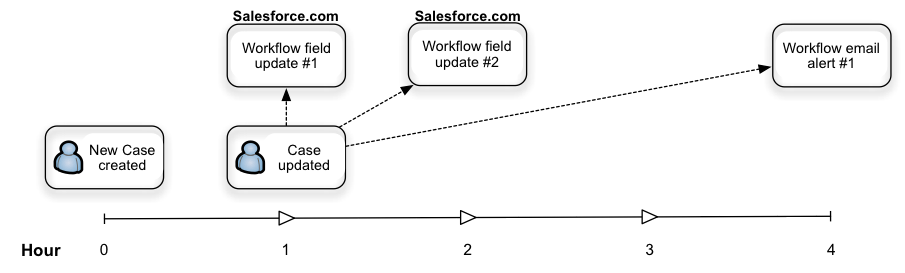
Figure 4-23. Three Workflow actions from a single workflow rule that are set to occur at three different times
Figure 4-24 shows what the updated time-based workflow actions queue would contain immediately after the workflow rule in 4-23 was triggered.

Figure 4-24. Time-based workflow actions queue where a Case workflow rule has been triggered on 5/14/14 at 6:02 PM
Figure 4-25 also has multiple future updates. However, in this case, they are not based on the time of the update; they are based on a Date/Time field on the object, which takes place one hour and one day before the corresponding Date/Time value.
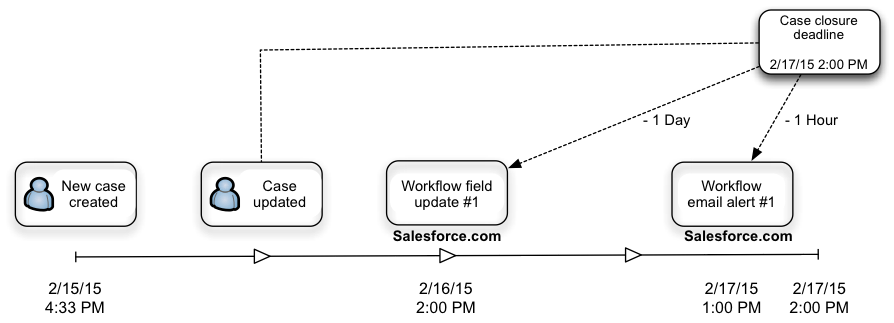
Figure 4-25. This workflow rule uses a time trigger based on a Date/Time field that is on the record instead of the Rule Trigger Date value.
Figure 4-26 shows what the time-based workflow queue actually looks like while the actions are pending.

Figure 4-26. Time-based workflow queue showing the pending actions from the example in Figure 4-22
You have seen what happens initially with a time-based workflow rule; the corresponding time-based actions are created and scheduled relative to the time trigger. However, you should also be familiar with the rule’s behavior after the actions are first created. Table 4-6 presents an example of a time-based workflow rule that goes through multiple modifications.
Table 4-6. Breakdown of How Changes to a Record Are Handled by a Workflow Rule
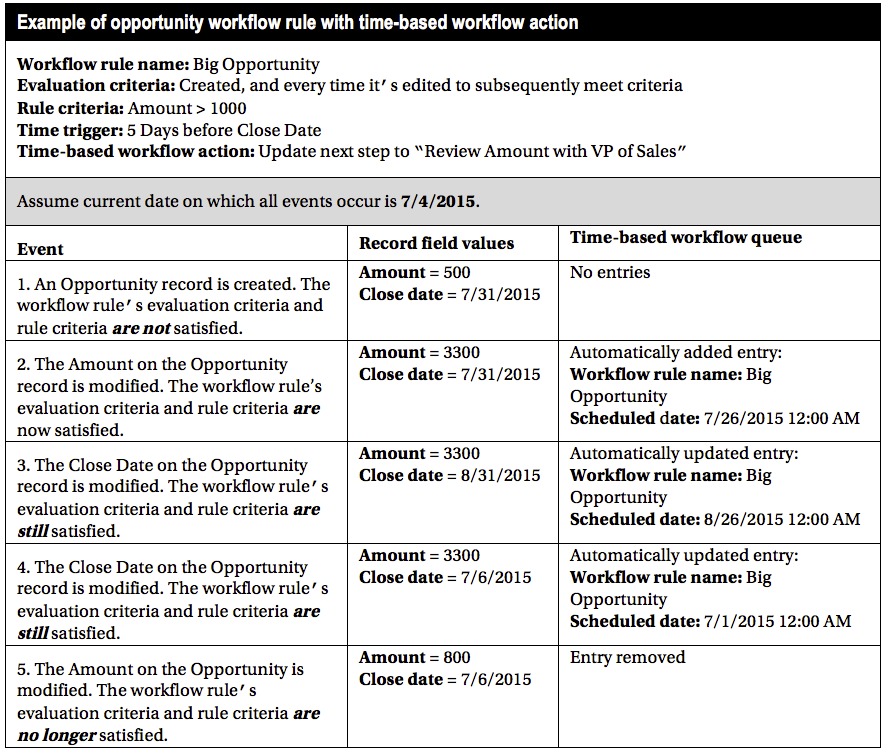
To explain why the time-based workflow queue was updated as described in Table 4-6, here are some additional details:
NOTE It is critical to be aware of how time-based workflow actions are processed. These actions are executed in batches, not individually. This means that your time-based workflow actions will likely not occur precisely at the configured time. Salesforce does not publish how frequently batches are processed. In my experience, batches have been executed every 15 minutes starting on the hour (that is not official and may change at any time). Consider the practical impact to your rules. If you have an action queued for 1:14 PM, it would occur one minute later at 1:15 PM. However, if you have an action queued for 1:16 PM, it will likely not occur for 14 additional minutes, until 1:30 PM. Make sure to thoroughly test what you’ve built and do not use time-based workflow rules if absolute precision is a business requirement.
Thanks for reading. Make sure to check out Part II!